The parts have arrived! It’s time for assembly.

PCB and Parts are here!
The printed boards from OSHPARK arrived recently and so did the components. Below is a list of the components I selected for this board.
| Item | Mfg | Qty | Description |
| Enclosure | Hammond | 1 | Aluminum enclosure for stompbox |
| Resistors | Elegoo | 1 | 525 pack of assorted resistors from 0-1M |
| Diodes | MclgclM | 1 | 100 pack of assorted diodes |
| DC Barrel Jack | ThreeBulls | 1 | 12 pack of 5.5mm x 2.1mm |
| Op-amp | Fairchild | 10 | Dual op-amp (LM358N) |
| Capacitors | Foxnovo | 1 | 125 pack of assorted capacitors |
| Transistors | FUNMANY | 1 | 450 pack of assorted transistors |
| Footswitch | Etopars | 1 | 6 pack of DPDT latching foot switches |
| PCB | OSHPARK | 3 | Prototype PCBs from OSHPARK |
Prototype PCB from OSHPARK
Check out the images of the PCB OSHPARK made for me.

Prototype PCB
Some Corrections
I started to build the pedal circuit and realized I did not need 100mF caps everywhere. I re-simulated the circuit with 100uF caps, and it works just fine. I started with a huge cap value just as a placeholder and never updated the schematic.
Prototype One
For the first build, I soldered the components on and just left fly wires hanging off. I did this so I could pump signals into it and test the circuit response. See the prototype one below.

Prototype One
I didn’t save my oscilloscope captures.. I will remember next time! The good news is that from 20Hz to 8kHz there was a good solid amplification with minimal change of the input signal. Driving the input harder resulted in soft-clipping, but it was very minimal and still showed a solid gain performance. As predicted in the previous post, there was an amplification of around 2-3x the input signal, resulting in a noticeable volume increase.
Prototype Two
The second prototype is the “final product.” I stuck the circuits + inputs/outputs in the enclosure I purchased. It made for a nice looking product at the end of the day.
-
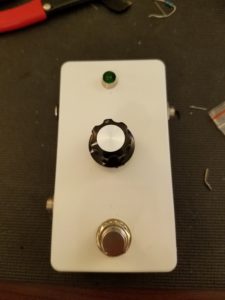
- Prototype 2 – Control Surface
-
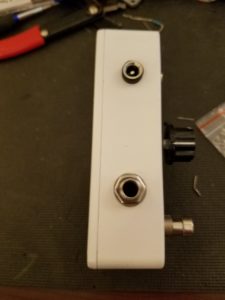
- Prototype 2 – Output/Power Side
-
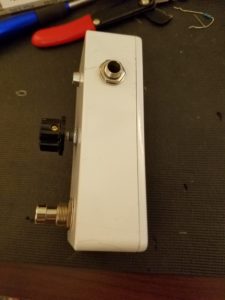
- Prototype 2 – Input Side
I am very happy with the results! It works and sounds great!
Restrospective
So, the question must be asked, did I complete my stated list from the previous post? The list is below as a reminder.
- Take an AC signal around 300mV pk-pk and boost it by some multiple
- Check! It takes an input signal and boosts it by 2-3x
- The boosted signal should not be muddled or distorted/clipped in any way
- Aside from the soft clipping when driving the input stage hard, yes!
- The output signal should model the input signal, with the only difference being the amplitude
- Check!
- It should run on +9V (either a battery or a standard guitar pedal wall-wart)
- Check!
- It should have an adjustable output gain
- Check!
- It should have a bypass capability
- Check!
- It should not load the input source too much
- Check! Simulation showed less than 10mA sink.
- It should have enough power to drive the output easily
- Check! It drives my amp input just fine!
In retrospect, I completed my requirements. But no retrospective is complete without some lessons learned and a demo!
Lessons Learned
- I need to think about power input filtering on my next design. My 1Spot brand wall wart induces a high pitch whistle into the output stage that a 9V battery does not. It does this on every pedal I own, so this may be more of a power supply issue, but it might be solved with some input filtering. The whistle is barely noticeable, but in a very quiet room, I hear it.
- More time needs to be spent on laying out the physical interface. I just sort of hacked this one together, but a more complex project could have been difficult.
- Use quieter switches. I bought cheap DPDT switches, and they’re pretty loud engaging/disengaging. Listen for them on the demo.
Demos
Clean Boost Example
This example shows the clean boost aspect of the pedal. It simply boosts the volume of the signal.
Overdrive Boost
This example shows the pedal driving an amp harder into overdrive and getting a nice crunchy result.
Wrap-Up
All in all, I had a great time building this pedal, and I’ll continue making more pedals in the future! Stay tuned for the next project!
Thanks for reading!

4 comments
Hi bought this on oshpark is this your clean booster. If yes I’d really appreciate a BOM as just after I bought it I noticed the dropbox link to the BOM is outdated.
https://oshpark.com/profiles/giacu92
This is not my clean booster, sorry!
Which opamp is it. You just named Fairchild. Do you have something more exact, what to buy? some standard one e.g TL082CP, LM358N, does it matter?
BR
Jürgen
Hi Jürgen,
Good catch! It’s the LM358N. I will update the post! Thanks for commenting!
-jacob